
Appearance
Flow Editor
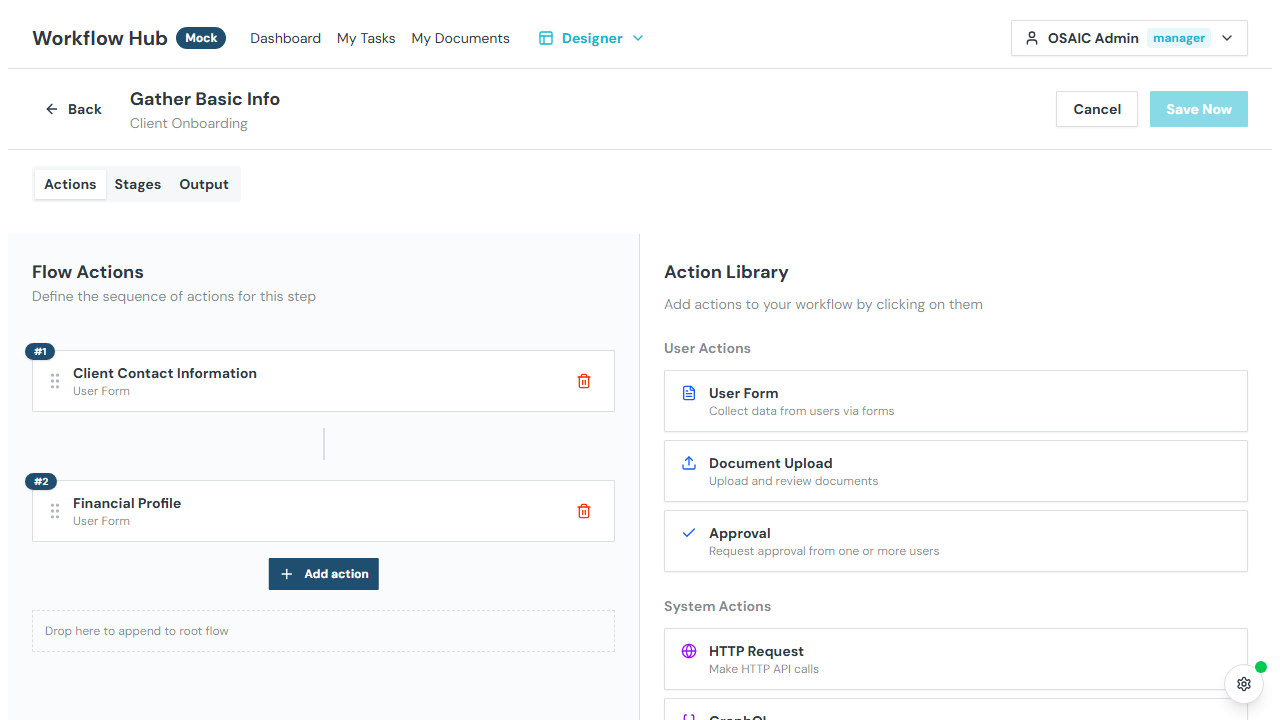
The Flow Editor is where you design the action flow for a workflow step. Actions define what happens when a step executes — user tasks, API calls, email notifications, conditional logic, and more.
INFO
Access the Flow Editor by clicking Edit Flow on a step in the Template Editor.
Layout
The Flow Editor has three tabs and a split-panel layout (approximately 25/75):
- Left panel — action tree showing the hierarchical structure
- Right panel — configuration form for the selected action
Drag the splitter between panels to resize them to your preference.
Actions Tab
Action Tree
The left panel shows all actions in the step as a hierarchical tree. Actions can be:
- Sequential — each action runs after the previous one completes
- Nested — inside conditional branches, parallel blocks, or loops
Each action shows its name, type icon, and a drag handle for reordering. If the action has a stage assigned, a colored badge appears next to the name showing the stage color and name.
- Click an action to select it and view its configuration
- Drag an action to reorder or move it into a different container
- Click Add Action to insert a new action at that level
- Right-click an action (or use the action menu) to Duplicate it, including all child actions
- Use the action menu to Move an action to a different container
Action Library
When adding a new action, the action library opens as a 3-column grid of cards showing all available types:
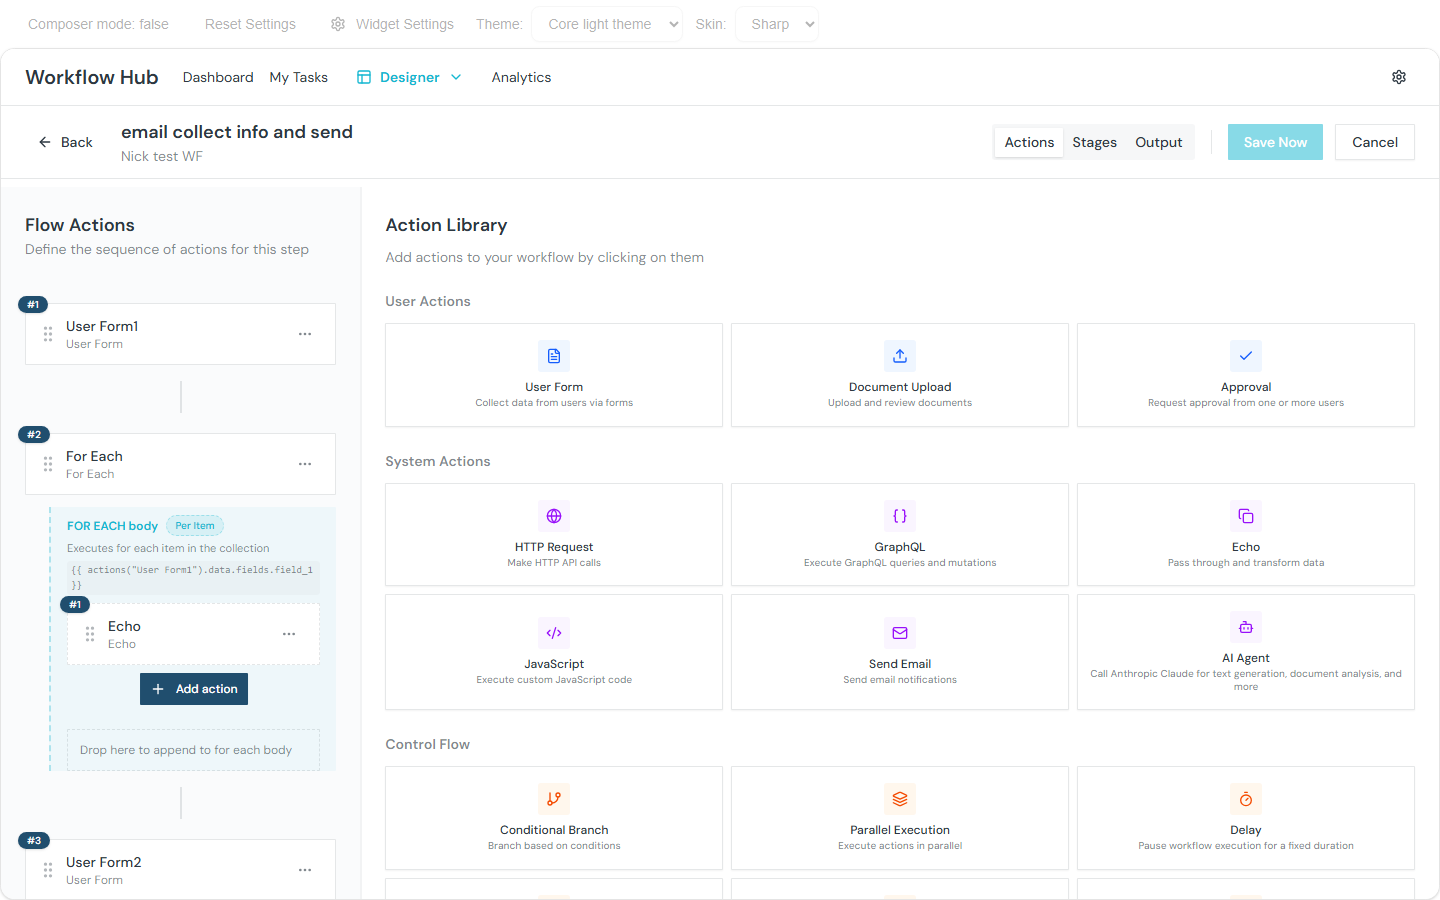
User Tasks
| Action | Description |
|---|---|
| User Form | Collect data from an assigned user via a form |
| Approval | Request approval or rejection from a user |
| Document Upload | Collect files from an assigned user |
System Actions
| Action | Description |
|---|---|
| HTTP Request | Make an API call to an external service |
| GraphQL | Execute a GraphQL query |
| JavaScript | Run custom JavaScript code |
| Echo | Transform or reshape data |
| Send Email | Send an email notification |
Control Flow
| Action | Description |
|---|---|
| Conditional (If/Then/Else) | Branch based on one or more conditions with AND/OR logic |
| Parallel | Run multiple actions simultaneously |
| Delay | Pause execution for a duration |
| ForEach | Iterate over a collection, running child actions for each item |
| Loop | Repeat actions while a condition is true (while or do-while) |
| Set Variable | Update a workflow variable |
Iteration Actions
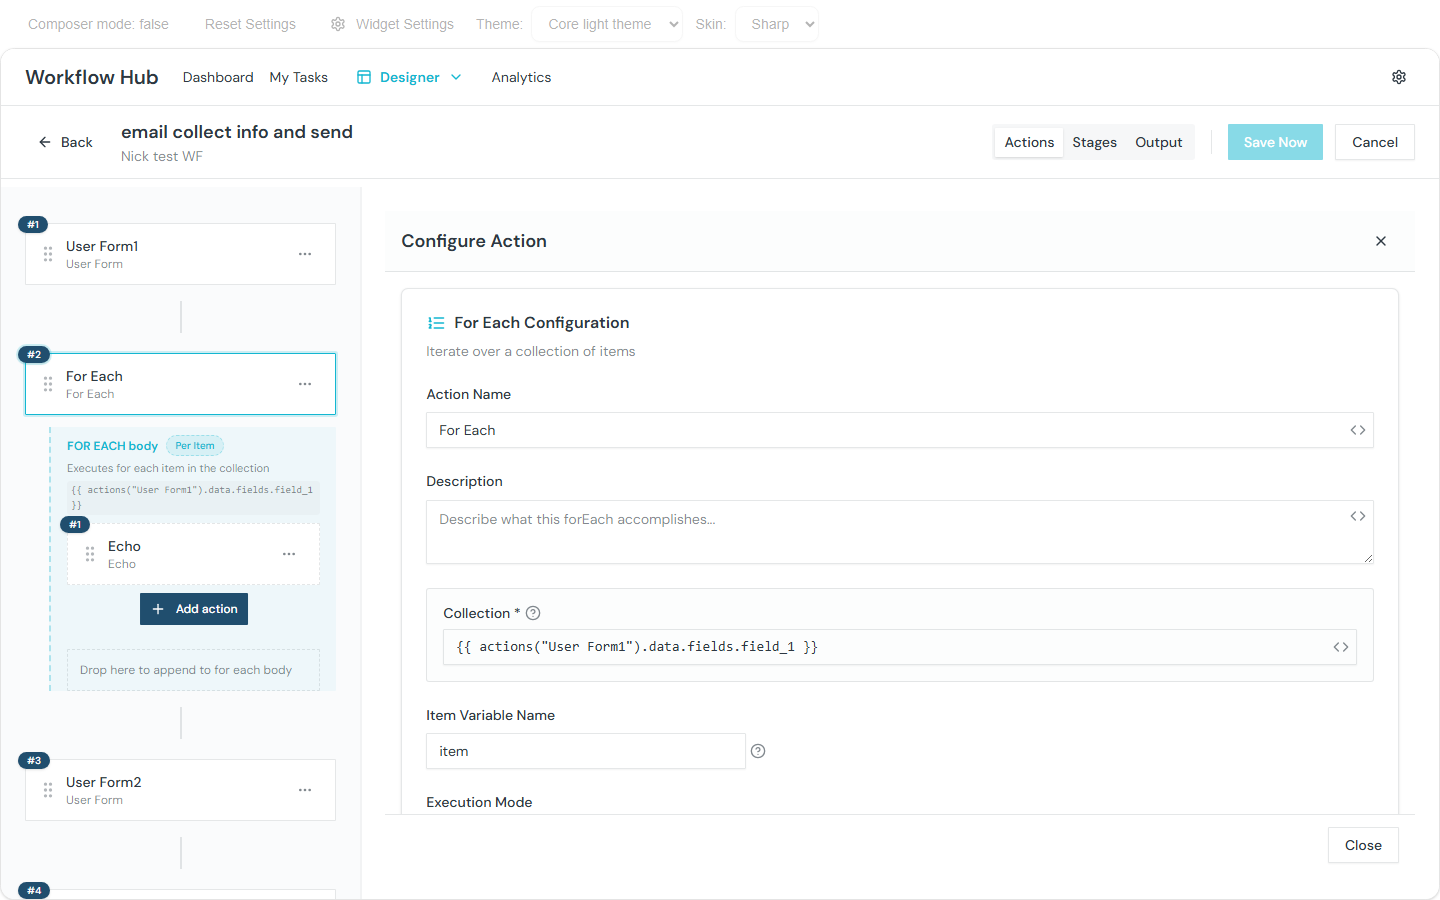
ForEach
The ForEach action iterates over a collection of items, running its child actions once per item. Use it for batch processing — e.g., iterating over a list of records returned by an API call.
| Setting | Description |
|---|---|
| Collection | Template expression pointing to an array (e.g., {{ actions("getData").result.records }}) |
| Item Variable | Name for the loop variable (default: item), accessible as {{ item }} |
| Execution Mode | Sequential (one at a time) or Parallel (concurrent) |
| Max Concurrency | Maximum parallel iterations (1–1000, only in parallel mode) |
Loop Variables
Inside a ForEach or Loop body, these variables are available:
| Variable | Description |
|---|---|
{{ item }} | The current item from the collection (ForEach only) |
{{ loop.index }} | Zero-based index of the current iteration |
{{ loop.iteration }} | One-based iteration count |
{{ loop.first }} | true on the first iteration |
{{ loop.last }} | true on the last iteration |
{{ loop.previous.actions("name") }} | Output from the same action in the previous iteration |
Loop (While / Do-While)
The Loop action repeats its child actions while a condition remains true.
| Setting | Description |
|---|---|
| Loop Type | While (check condition first, may run zero times) or Do-While (run once, then check) |
| Condition | Condition builder with left operand, operator, and right operand |
| Max Iterations | Safety limit to prevent infinite loops (1–1000, default 100) |
| Auto-Prefill Tasks | Carry forward form data from the previous iteration using {{ loop.previous.actions("taskName").data }} |
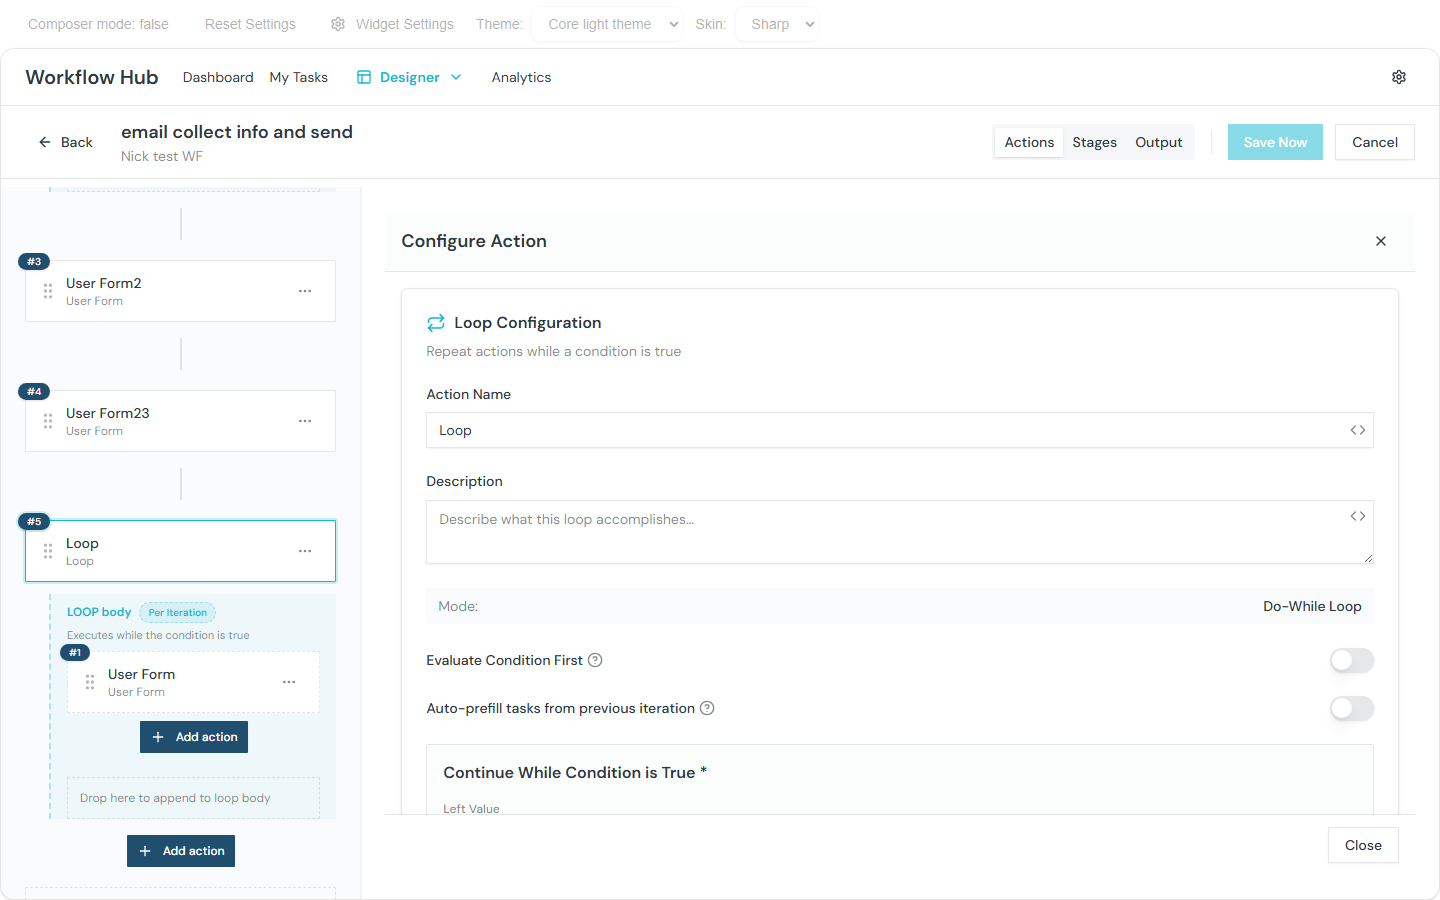
At runtime, each iteration appears as a numbered tab on the step detail page. Click a tab to see the actions and results for that specific iteration.

Action Configuration
When you select an action in the tree, the right panel shows its configuration form. Fields vary by action type.
Common Fields
- Name — display name for the action
- Description — optional description (supports Scriban template expressions for dynamic text)
User Task Configuration
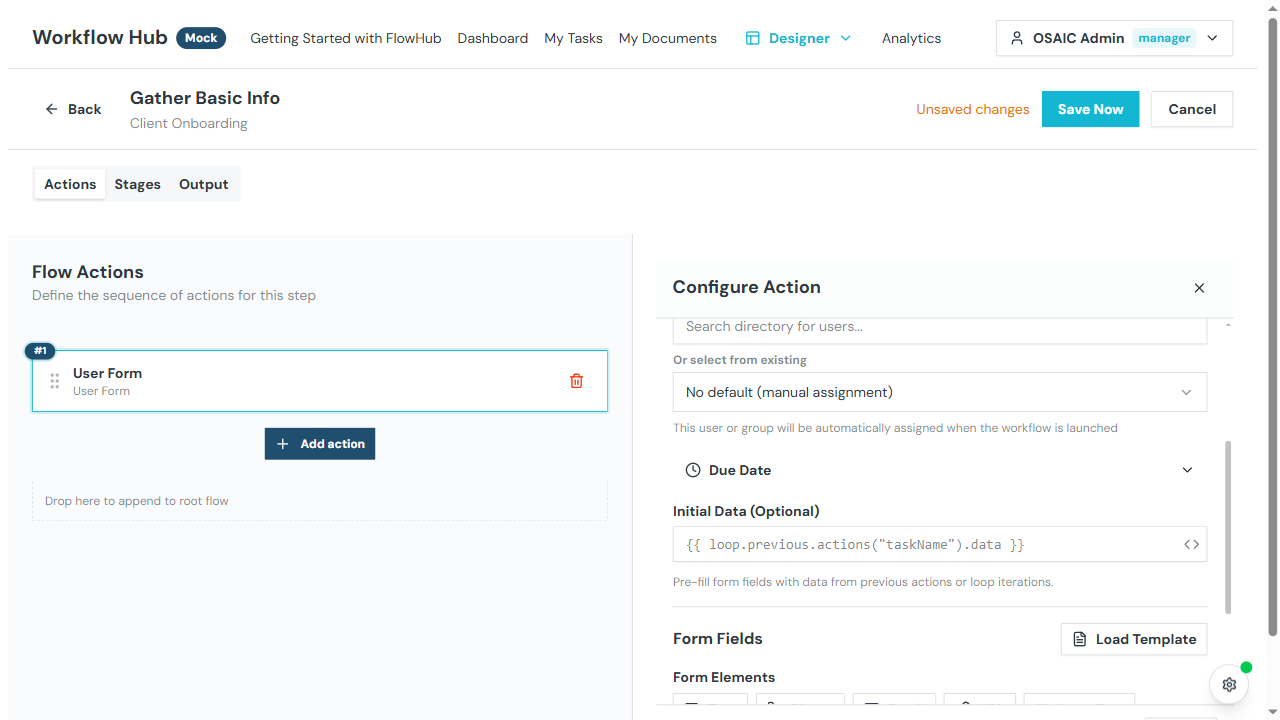
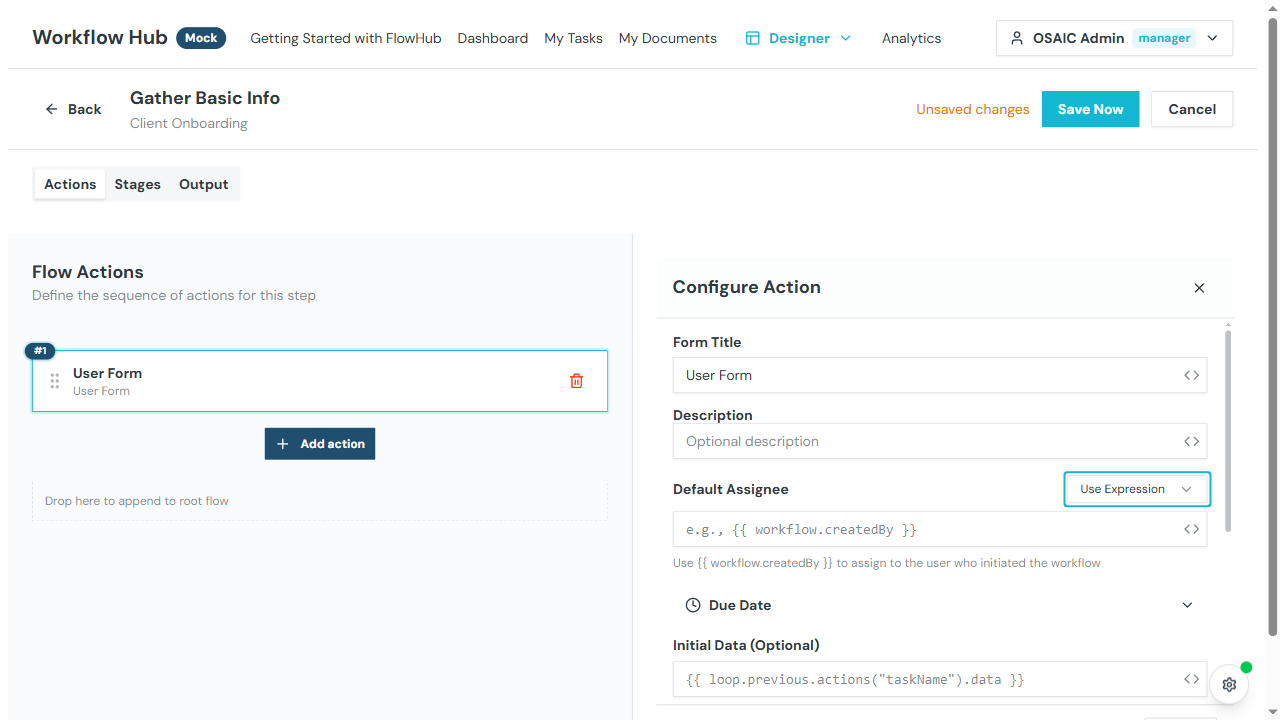
- Assignee — who should complete this task. The selector has two modes:
- Select — pick a specific user or group from the directory
- Expression — use a variable expression, e.g.
{{ workflow.createdBy }}to assign to the person who launched the workflow
- Form fields — field definitions for form tasks (or select a Form Task Template)
- Initial data — pre-fill fields with values from workflow variables (see Smart Values below)
- Document requirements — what files are needed (for document upload tasks)
HTTP Request Configuration
- URL — the endpoint to call (supports template expressions)
- Method — GET, POST, PUT, DELETE, PATCH
- Headers — request headers
- Query parameters — URL query string
- Body — request payload
- Credentials — select saved credentials from the Credentials Vault to authenticate the request
- Retry policy — max attempts and backoff strategy for failures
Email Configuration
- Recipients — email addresses (static or from workflow variables)
- Subject — email subject line (supports template expressions)
- Body — email content (HTML or text, supports template expressions)
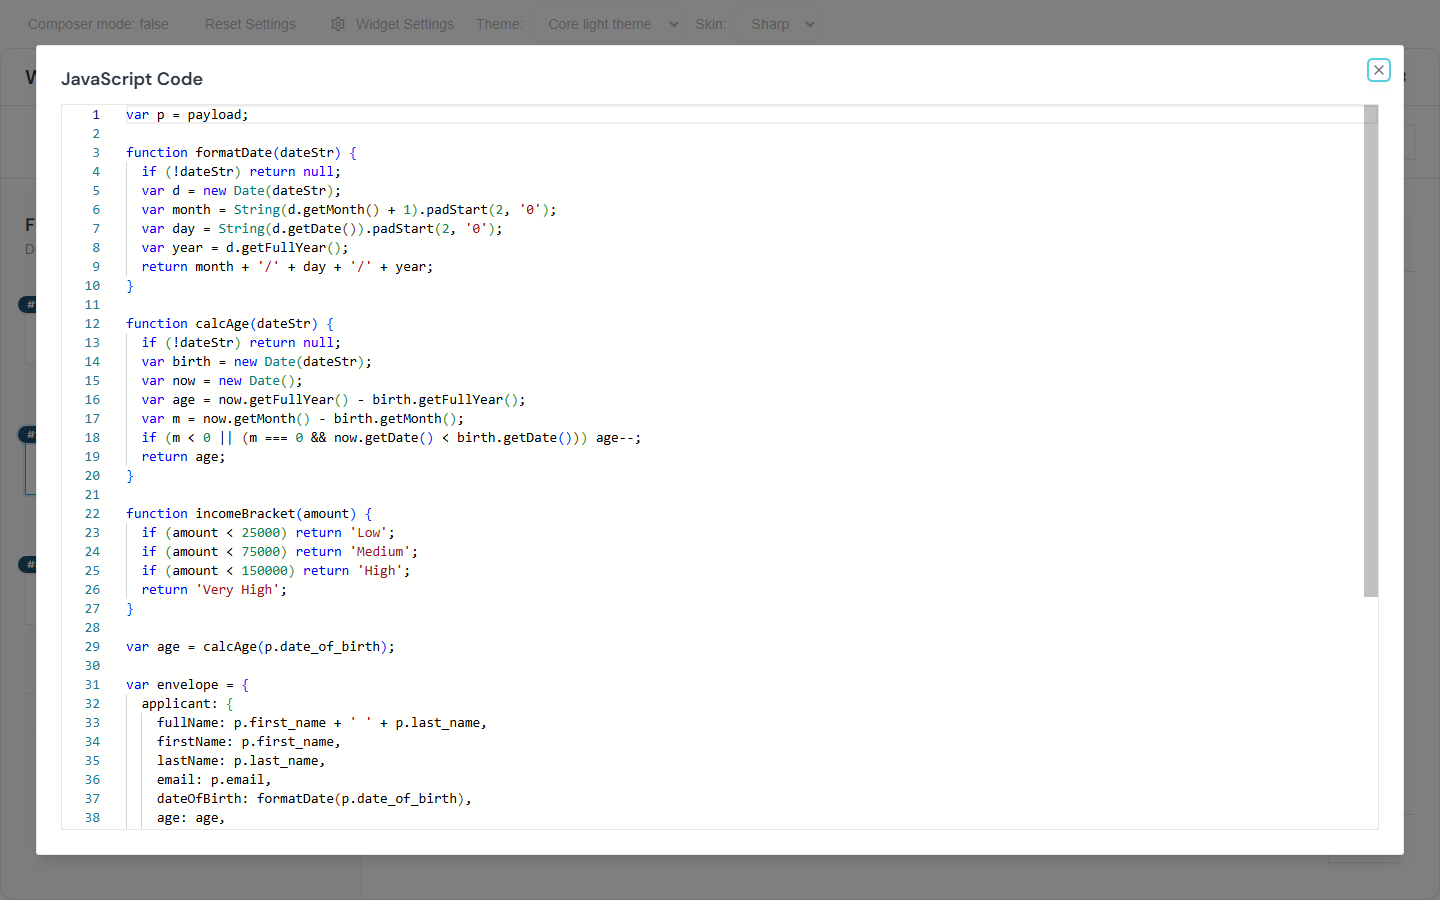
JavaScript Editor
The JavaScript action includes an enhanced editing experience:
- Expand to Modal — click the expand icon to open a full-screen code editor with more space
- Bulk Input/Output Pickers — tree-based pickers for selecting multiple input and output variables at once
- Generate JS Parser — for HTTP actions, click this button to auto-generate JavaScript code that parses the HTTP response into structured output variables
Conditional Configuration
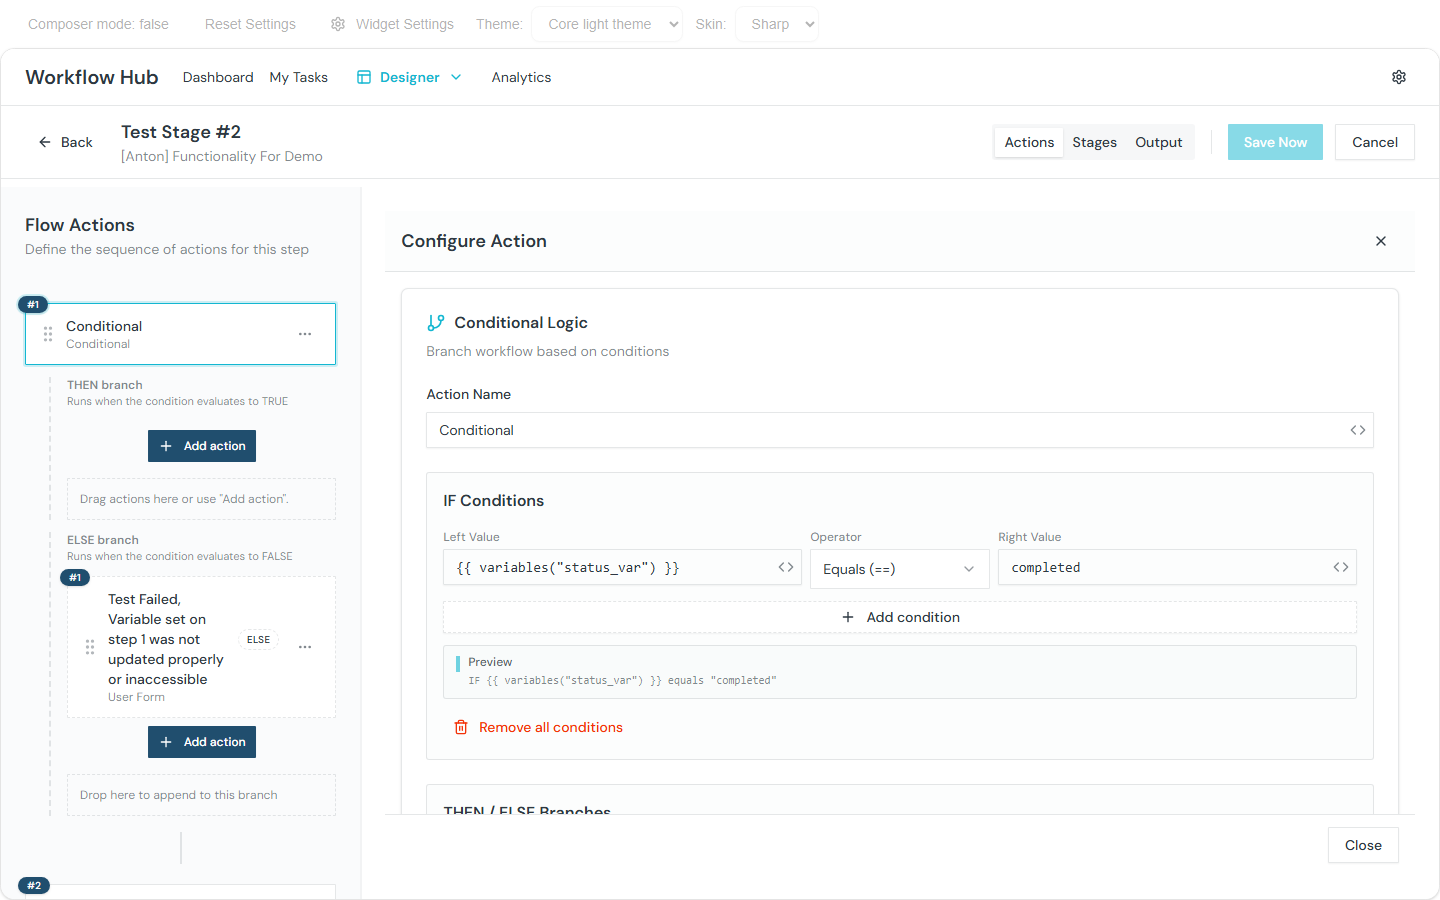
Configure one or more conditions with a combinator:
- Conditions — each condition has a left operand, operator, and right operand
- Binary operators: equals, not equals, contains, greater than, less than, match regex, array contains, and more
- Unary operators: is true, is false, is empty, is not empty
- Combinator — when you have multiple conditions, choose:
- ALL (AND) — all conditions must be true
- ANY (OR) — at least one condition must be true
- Condition Preview — a human-readable summary of the combined condition
- Then branch — actions to run if the combined condition is true
- Else branch — actions to run if the combined condition is false
Delay Configuration
- Duration — fixed duration or template expression (e.g.,
{{ input.delayDays }}days)
Output Mapping
Each action can map its output to workflow variables. In the action configuration, define:
- Source expression — path to the data in the action's output
- Target variable — workflow variable name to store the value
Error Handling
Configure what happens when an action fails:
- Stop — halt the workflow step
- Continue — skip the error and proceed to the next action
Smart Values
Smart Values let you insert dynamic data into action fields using the {{ expression }} syntax. They are used in task initial data, email bodies, descriptions, HTTP URLs, and more.
Available Variable Scopes
| Scope | Syntax | Description |
|---|---|---|
| Input data | {{ input.field_name }} | Values from the workflow launch form |
| Context | {{ context.client.firstName }} | Entity data (Client, Account, Household) passed from the portal |
| Workflow metadata | {{ workflow.createdBy }} | Workflow-level info (ID, initiator) |
| Action output | {{ actions("action_name").field }} | Output from a previous action in the same step |
| Previous loop iteration | {{ loop.previous.actions("taskName").data }} | Data from the same task in the previous loop cycle |
Using Smart Values in Form Pre-fill
When configuring a User Form action, the Initial Data field accepts a Smart Value expression. The resolved values are used to pre-fill the form fields before the assignee opens the task.
Common patterns:
- Pre-fill from input —
{{ input }}passes all launch form data as initial values - Pre-fill from previous action —
{{ actions("collectInfo").data }}carries forward data entered in an earlier form - Loop carry-forward —
{{ loop.previous.actions("reviewForm").data }}lets a reviewer see data from the previous iteration
TIP
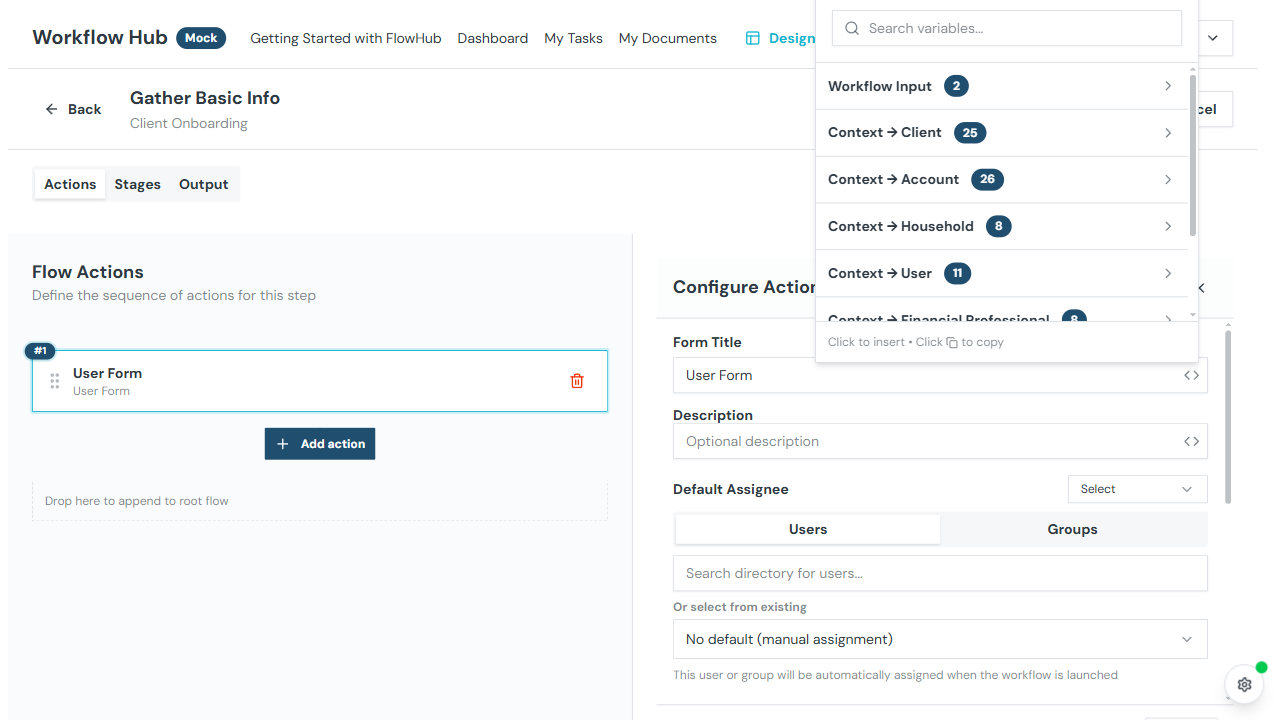
The Initial Data field provides a variable picker that shows all available variables in context. Click the {x} icon to browse and insert variables.
Import Variables
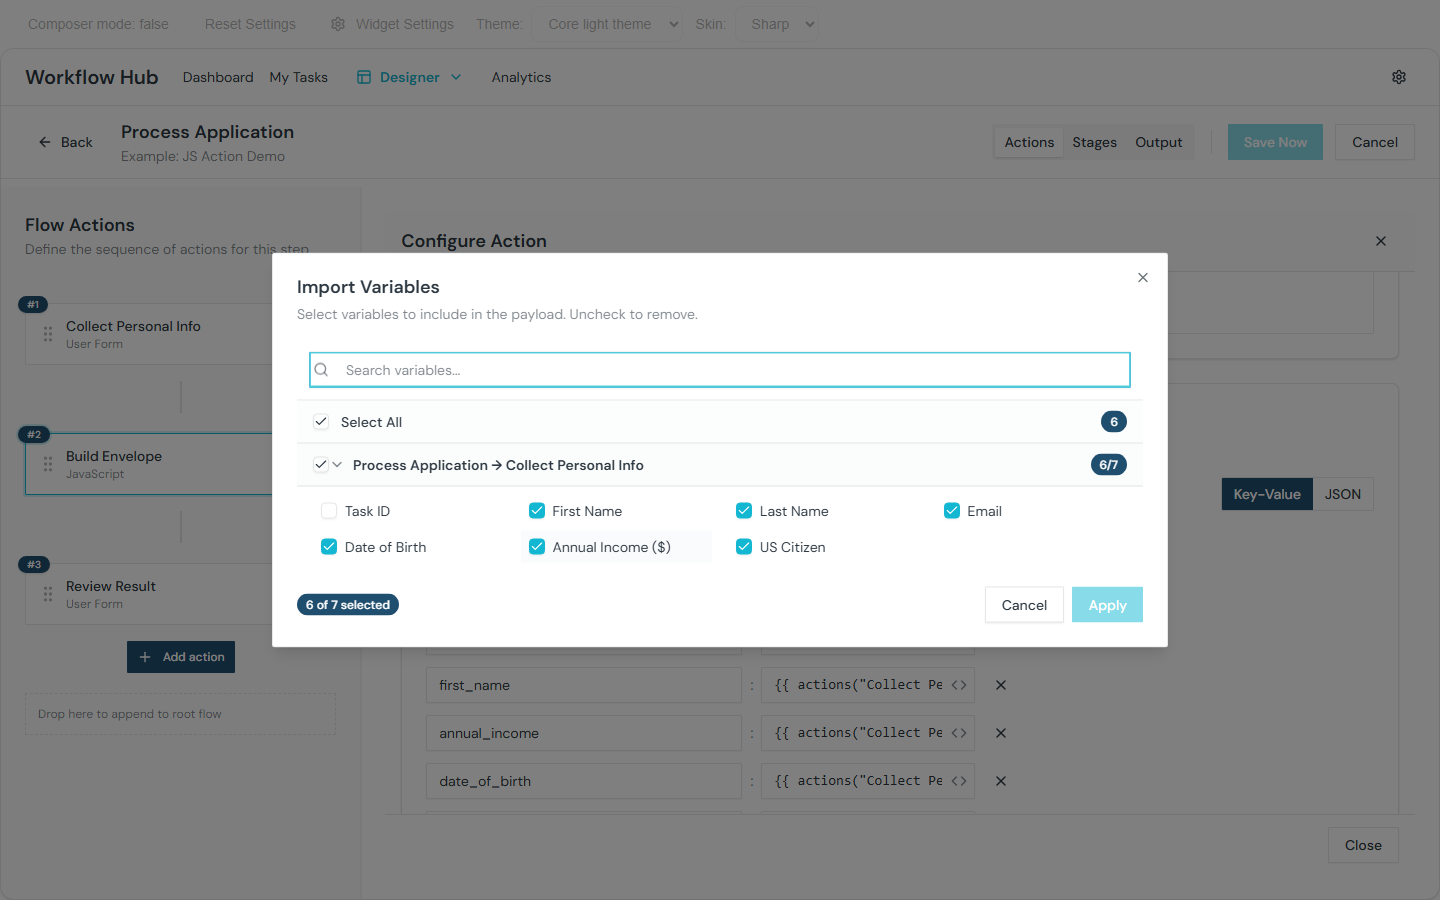
The Import Variables modal lets you bulk-import variables from other actions or workflow scopes into the current action's configuration.
- Grid layout — variables displayed in a searchable, scrollable grid
- Bidirectional — add variables to or remove variables from the current selection
- Filters — quickly find variables across all available scopes
Credentials Vault
The Credentials Vault stores authentication credentials for external services. Credentials are used in HTTP Request actions to authenticate API calls without embedding secrets in the workflow template.
Supported Authentication Types
| Type | Description |
|---|---|
| OAuth 2.0 | Token-based authentication for services like Salesforce, Microsoft, HubSpot |
| Basic Auth | Username/password authentication |
Supported Providers
The vault includes pre-configured provider integrations: Schwab, Salesforce, QuickBooks, Microsoft Entra, HubSpot, Orion, Redtail, Wealthbox, and others.
Managing Credentials
Credentials are managed in the External Apps section of the platform preferences. To create a credential:
- Navigate to Preferences → External Apps
- Click Add Credential
- Select the provider and authentication type
- Enter the required configuration (base URL, client ID, secrets, etc.)
- Save the credential
Using Credentials in Actions
When configuring an HTTP Request action, select a credential from the Credentials dropdown. The selector shows credentials grouped by provider, with search to quickly find the right one. Select None to make unauthenticated requests.
Stages Tab
Define workflow stages — named states that the step can be in (e.g., "Submitted", "Under Review", "Approved").
- Add Stage — create a new stage with a name and color
- Reorder — use up/down buttons to change stage order
- Edit — change the stage name or color
- Delete — remove a stage
Stages are used to track the progress of a step through different phases.
Output Tab
Define output mappings for the step — which action results should be exposed as step-level output variables.
- Add Mapping — select a source (action output) and target (output variable name)
- Remove Mapping — delete an existing mapping
Saving
WARNING
The Flow Editor does not auto-save. Click Save Now to persist your changes. An "Unsaved changes" banner appears when you have pending edits.
If you try to navigate away with unsaved changes, a confirmation dialog warns you about losing your work.
Validation
The editor validates your flow before saving:
- Document upload tasks must have at least one document requirement
- Required fields must be properly configured
- The save button shows the number of validation errors (if any)