Appearance
Launch Workflow
Launching a workflow creates a new instance from a template. The launch wizard guides you through three steps: selecting a template, filling in input data, and reviewing before you submit.
How to Launch
You can start the launch wizard in two ways:
- Click Submit Request on the Dashboard
- Click a template in the Quick Access section on the Dashboard
Step 1: Select a Template
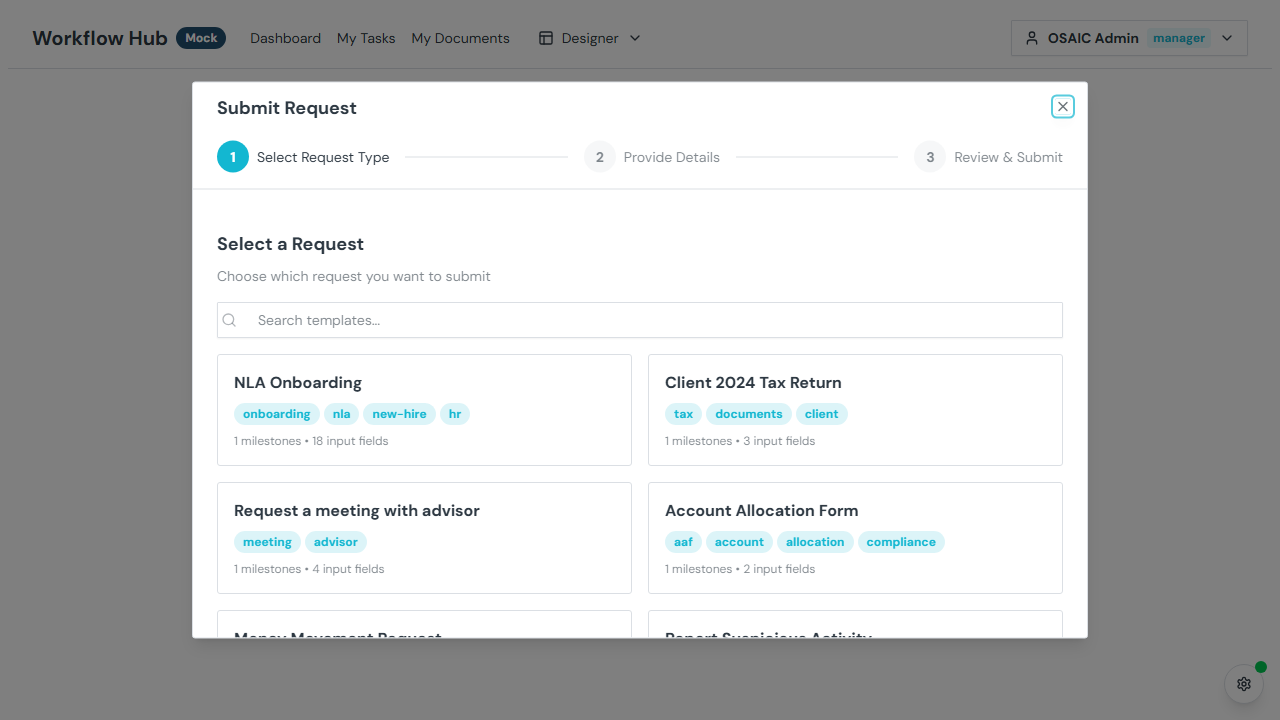
Browse the available workflow templates. Each template card shows:
- Name — the template's title
- Description — what this workflow is for
- Tags — category labels (e.g., "Onboarding", "Compliance")
- Milestones — how many milestones the workflow has
- Input fields — how many fields you'll need to fill in
Use the search box to filter templates by name or description.
Click Select on a template to proceed to the next step.
Step 2: Fill In Input Data
INFO
If the selected template has no visible input fields (all fields are hidden or pre-populated), Step 2 is automatically skipped and you proceed directly to Review.
A dynamic form appears based on the template's input schema. Fill in the required fields to provide the data your workflow needs to run.
Field Types
Depending on the template, you may see:
| Field Type | Description |
|---|---|
| Text | Single-line text input |
| Number | Numeric input (may have formatting masks like ###-##-####) |
| Date | Date picker |
| Checkbox | Yes/no toggle |
| Dropdown | Select from predefined options |
| Multi-select | Choose multiple options |
| Time Slot | Pick a time range |
Validation
- Required fields are marked and must be filled before you can proceed
- Number fields may have range validation (e.g., must be greater than 0)
- Date fields may have date range validation
- Formatted fields must match the expected pattern
Conditional Fields
Some fields only appear based on your answers to other fields. For example, selecting "Yes" on a checkbox might reveal additional detail fields.
Pre-populated Fields
If you launched from a link with URL parameters, some fields may already be filled in. You can still edit them before submitting.
Step 3: Review and Submit
Before launching, review your selections:
- Template — the workflow template you chose
- Input data — all the values you entered
- Task assignees — who will be assigned to each user task
Override Assignees
If the template has user tasks (forms, approvals, document uploads), you'll see the default assignees listed. You can change the assignee for any task before launching.
Submit
Click Submit to launch the workflow. The system will:
- Create a new workflow instance
- Begin executing the defined steps
- Redirect you to the new instance's detail page
A success notification confirms the workflow has been created.
Tips
- Not sure which template to use? Check with your team or look at the template descriptions and tags for guidance.
- Missing a template? Templates are created by administrators in the Designer. Contact your admin if you need a new workflow type.
- Need to launch the same workflow again? Just go through the wizard again — each launch creates a fresh, independent instance.